layoutInflate源码分析
获取方式
LayoutInflater layoutInflater = LayoutInflater.from(context);

LayoutInflater layoutInflater = (LayoutInflater) context.getSystemService(Context.LAYOUT_INFLATER_SERVICE);
两种方式都是获取到LayoutInflater对象,LayoutInflater.from其实内部调用的是getSystemService而已。
layoutInflater.inflate(resourceId, root);
显示View,接收两个参数,第一个参数就是要加载的布局id,第二个参数是指给该布局的外部再嵌套一层父布局,如果不需要就直接传null。
inflate的流程
- 通过
XmlPullParser找到view的START_TAG,并由此获取其对应的name; - 根据上面获取的name,判断是不是
<merge />标签,调用rInflate()方法; - 如果不是,则调用
createViewFromTag根据节点名来创建View对象。- 接着调用
rInflateChildren()方法展开每个子的view。 - 最后处理参数
root和attachToRoot的。
- 接着调用
整个的流程如下:
1、root和attachToRoot
- 如果root为null
- attachToRoot将失去作用,设置任何值都没有意义;
- 如果root不为null,
- attachToRoot设为true,则会给加载的布局文件的指定一个父布局,即参数中root。
- attachToRoot设为false,则将root的layoutParams属性读取出来,设置到最外层view上去。
LayoutInflater的使用中重点关注inflate方法的参数含义:
inflate(xmlId, null); 只创建temp的View,然后直接返回temp。
inflate(xmlId,parent); 创建temp的View,然后执行root.addView(temp, params);最后返回root。
inflate(xmlId, parent, false); 创建temp的View,然后执行temp.setLayoutParams(params);然后再返回temp。
inflate(xmlId, parent, true); 创建temp的View,然后执行root.addView(temp, params);最后返回root。
inflate(xmlId, null, false); 只创建temp的View,然后直接返回temp。
inflate(xmlId, null, true); 只创建temp的View,然后直接返回temp。
2、createViewFromTag
就是去创建View,内部调用了onCreateView。CreateView的内部实现是通过反射去做的。
Class<? extends View> clazz = mContext.getClassLoader().loadClass(prefix != null ? (prefix + name) :name).asSubclass(View.class);

Constructor<? extends View> constructor = clazz.getConstructor(mConstructorSignature);
constructor.setAccessible(true);
final View view = constructor.newInstance(args);
下面是按照上面的思路,构造的一个Button:
Button b = null;
final Class<?>[] mConstructorSignature = new Class[] {Context.class, AttributeSet.class};
try {
      Class<? extends View> clazz = getClassLoader().loadClass("android.widget.Button").asSubclass(Button.class);
      Constructor<? extends View> constructor = clazz.getConstructor(mConstructorSignature);
      constructor.setAccessible(true);
      b = (Button)constructor.newInstance(this, null);
} catch (ClassNotFoundException e) {
         e.printStackTrace();
} catch (NoSuchMethodException e) {
         e.printStackTrace();
} catch (IllegalAccessException e) {
         e.printStackTrace();
} catch (InstantiationException e) {
         e.printStackTrace();
} catch (InvocationTargetException e) {
         e.printStackTrace();
}
setContentView(b);
3、rInflate
内部是个循环的操作,直到xml的END_TAG,每一次循环都去调用createViewFromTag构建对应的View。
while (((type = parser.next()) != XmlPullParser.END_TAG || parser.getDepth() > depth) && type != XmlPullParser.END_DOCUMENT) {

if (type != XmlPullParser.START_TAG) {
    continue;
}

final String name = parser.getName();

if (TAG_REQUEST_FOCUS.equals(name)) {
    parseRequestFocus(parser, parent);
} else if (TAG_TAG.equals(name)) {
    parseViewTag(parser, parent, attrs);
} else if (TAG_INCLUDE.equals(name)) {
    if (parser.getDepth() == 0) {
         throw new InflateException("<include /> cannot be the root element");
    }
    parseInclude(parser, context, parent, attrs);
} else if (TAG_MERGE.equals(name)) {
        throw new InflateException("<merge /> must be the root element");
} else {
      final View view = createViewFromTag(parent, name, context, attrs);
      final ViewGroup viewGroup = (ViewGroup) parent;
      final ViewGroup.LayoutParams params = viewGroup.generateLayoutParams(attrs);
      rInflateChildren(parser, view, attrs, true);
      viewGroup.addView(view, params);
}
}
优化布局的一些建议
- 尽量使用RelativeLayout布局,减少不必要层级结构。xml文件解析实质是递归控件,解析属性的过程。所以说嵌套过深不仅效率低下还可能引起调运栈溢出。
- 使用merge属性。使用它可以有效的将某些符合条件的多余的层级优化掉,使用merge标签还是有一些限制的,具体是:merge只能用在布局XML文件的根元素;使用merge来inflate一个布局时,必须指定一个ViewGroup作为其父元素,并且要设置inflate的attachToRoot参数为true。
- 使用ViewStub。延时加载,或者在inflate时才去加载view,减低内存的消耗,来改善页面加载速度和提高流畅性。
- 使用include标签,提高布局的重用性。
- 控件设置widget以后对于layout_hORw-xxx设置0dp。减少系统运算次数。
进一步研究-setContentView
窗口window类的关系

- Window:抽象类,提供了绘制窗口的一组通用的API
- PhoneWindow:是Window的具体继承实现类。该类内部包含了一个DecorView对象,该DectorView对象是所有应用窗口(Activity界面)的根View。
- DecorView:是PhoneWindow的内部类,是FrameLayout的子类。
PhoneWindow提供了3中方式的setContentView:
public void setContentView(int layoutResID)

public void setContentView(View view)

public void setContentView(View view, ViewGroup.LayoutParams params)
其中,中间的调用的就是最后一个。
@Override
    public void setContentView(int layoutResID) {
        // Note: FEATURE_CONTENT_TRANSITIONS may be set in the process of installing the window
        // decor, when theme attributes and the like are crystalized. Do not check the feature
        // before this happens.
        if (mContentParent == null) {
            installDecor();
        } else if (!hasFeature(FEATURE_CONTENT_TRANSITIONS)) {
            mContentParent.removeAllViews();
        }

        if (hasFeature(FEATURE_CONTENT_TRANSITIONS)) {
            final Scene newScene = Scene.getSceneForLayout(mContentParent, layoutResID,
                    getContext());
            transitionTo(newScene);
        } else {
            mLayoutInflater.inflate(layoutResID, mContentParent);
        }
        mContentParent.requestApplyInsets();
        final Callback cb = getCallback();
        if (cb != null && !isDestroyed()) {
            cb.onContentChanged();
        }
    }
installDecor
构建DecorView,非常复杂,暂时忽略!!!
onContentChanged
这个是在Window中定义的空方法,在Activity中继承了,但是并未具体实现,是由用户再去实现的。
整体流程
- 创建一个DecorView的对象mDecor,该mDecor对象将作为整个应用窗口的根视图。
- 依据Feature等style theme创建不同的窗口修饰布局文件,并且通过findViewById获取Activity布局文件该存放的地方(窗口修饰布局文件中id为content的FrameLayout)。
- 将Activity的布局文件添加至id为content的FrameLayout内。
- 当setContentView设置显示OK以后会回调Activity的onContentChanged方法。
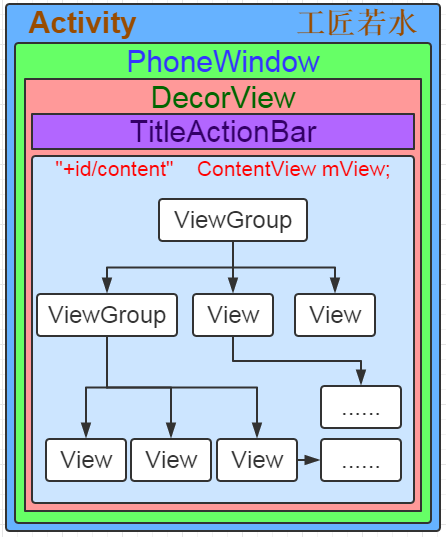
上图很好的揭示了窗口之间的关系。